Worked Examples
This section describes how you can create three types of rules using AMDL. You create rules from the Rules menu in the Analytics section of the portal interface.
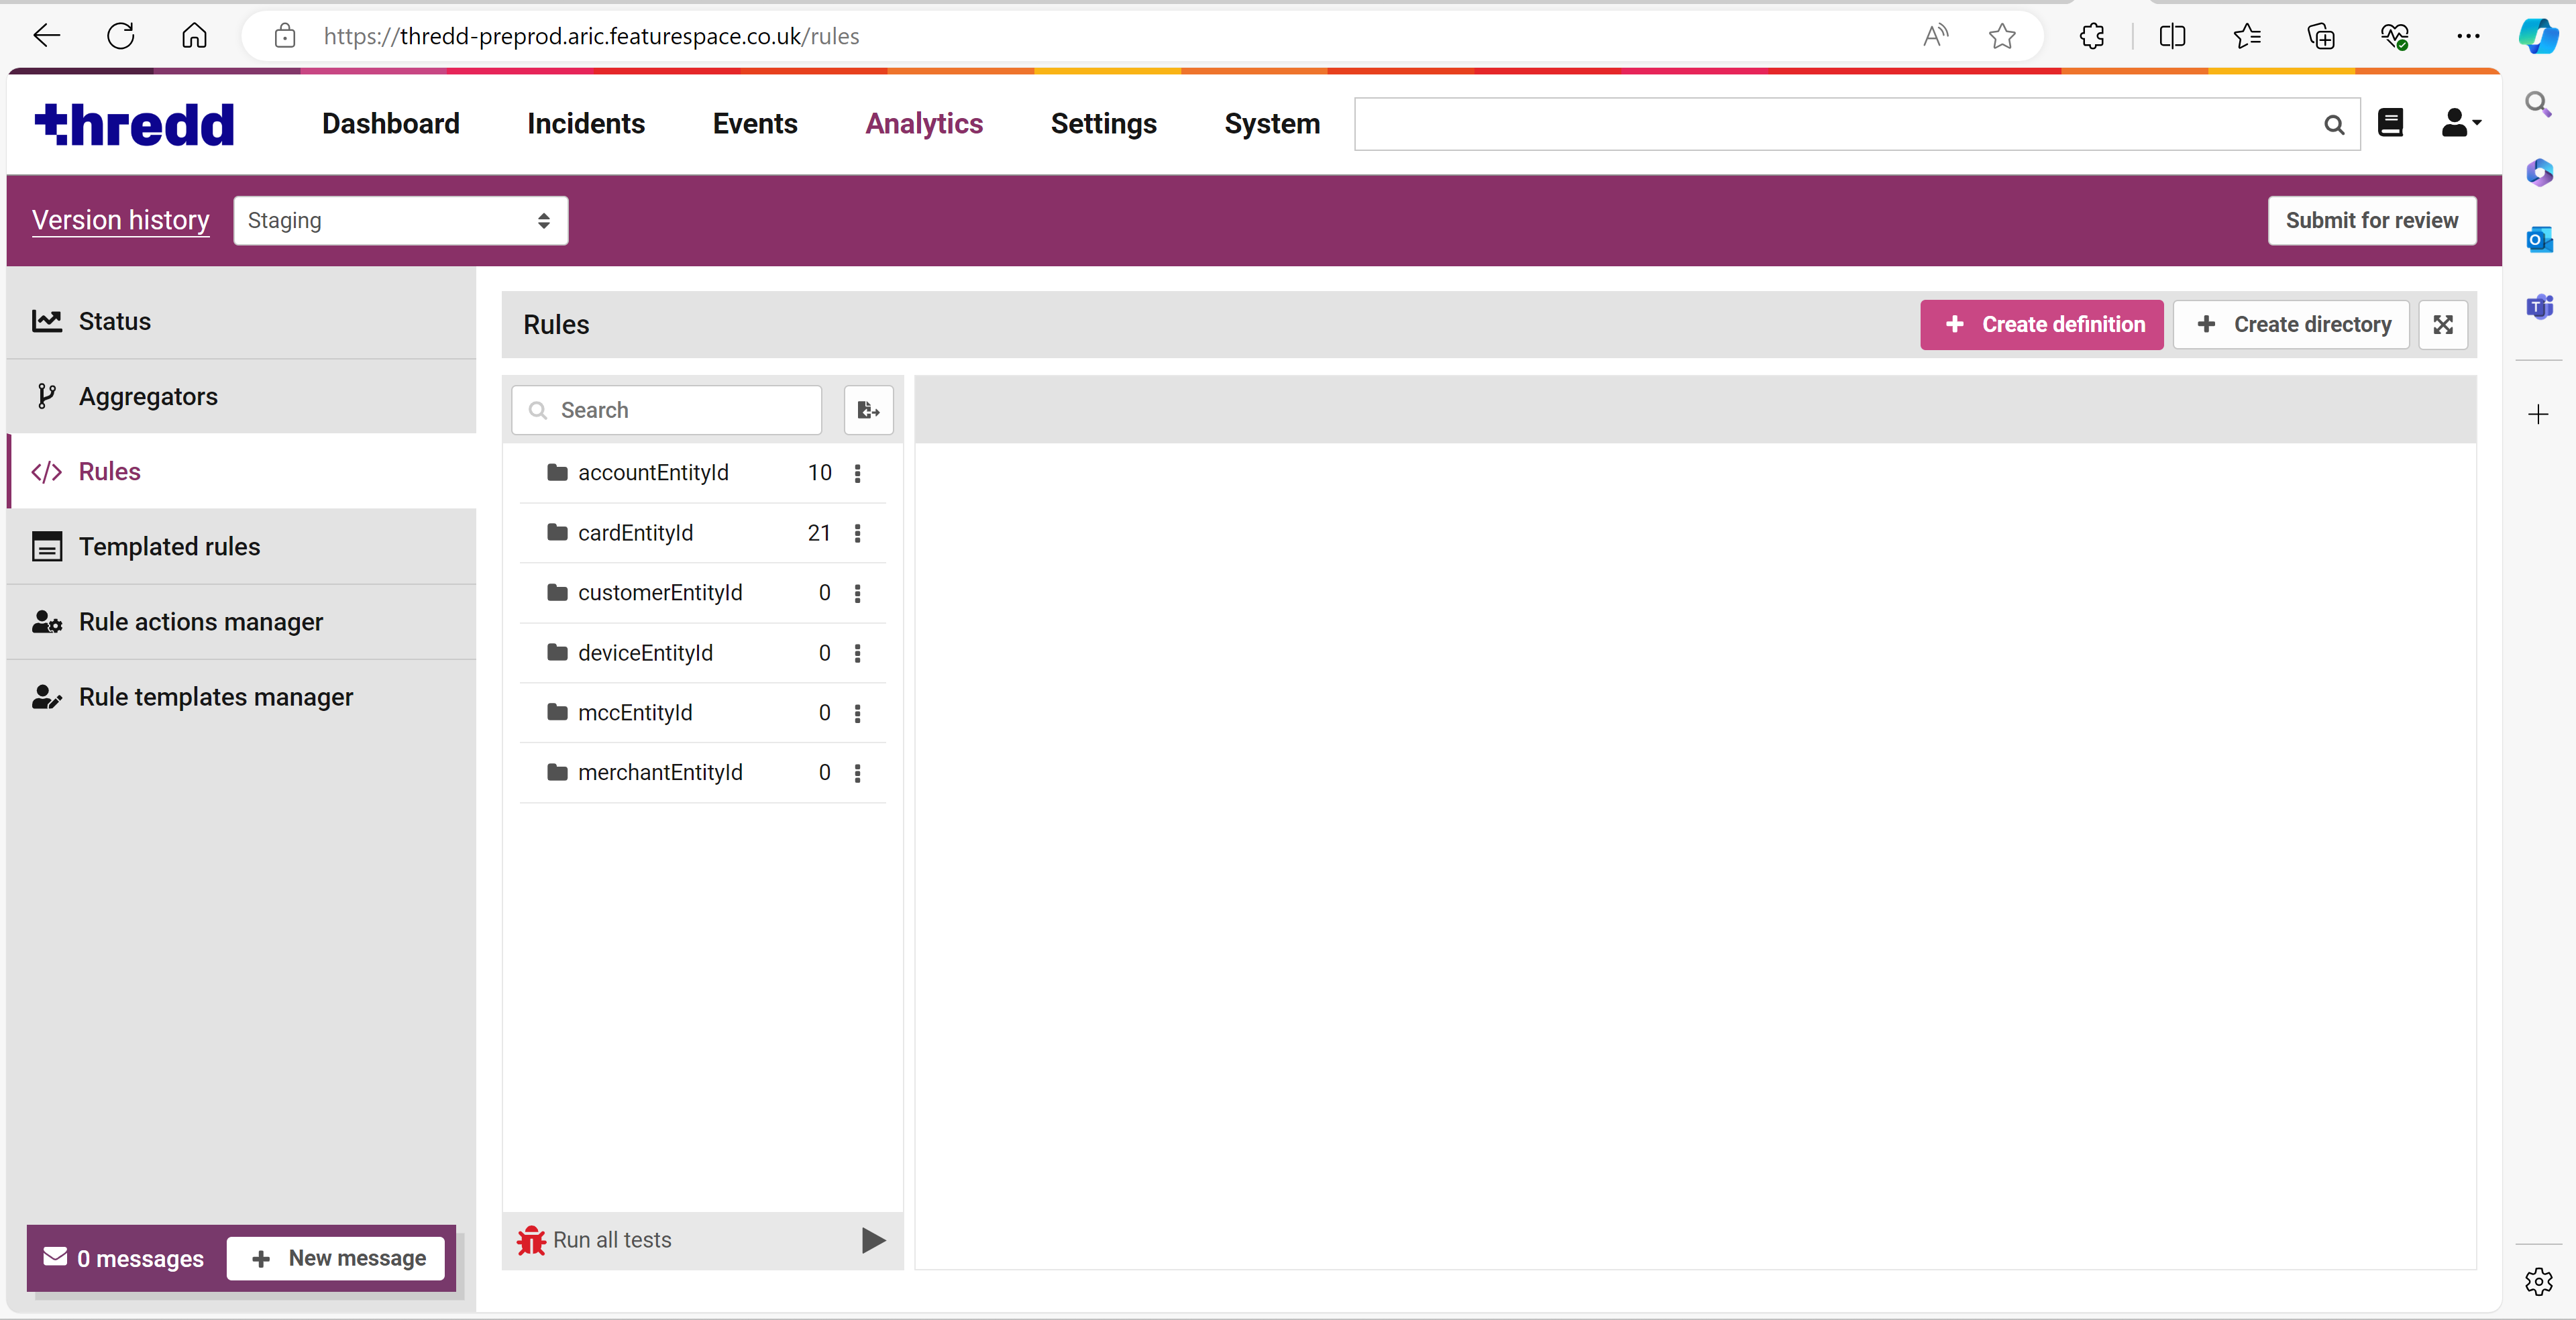
Figure 2: Portal Interface in the Fraud Transaction Monitoring System
The rules described in this section include a:
- Rule with an entity.
- Rule for all transactions in a period.
- Rule for all transactions at a merchant.
If you are new to Fraud Transaction Monitoring System, you should start by creating the first rule, and then create the second and third rules.
For each rule you create, you can run unit tests to ensure that they work correctly. The unit tests generate an event with the data appearing in JSON format.
Rule with an Entity
In this example, you create a new rule with a card entity. The rule includes an alert (by using the @alert annotation). The eventType is cardRT and the authorisation baseValue is equal to or greater than 1000. Thredd converts any currency the cardholder has on the transaction into GBP and displays it in the baseValue field.
CardRT represents real-time transactions where the cardholder information is passed at the time of the transaction. Conversely, CardNRT indicates non-realtime transactions where the merchant passes the card information later in a working day, rather than immediately.
Create a Rule
- Log into the UI.
- Go to Analytics.
- Go to Rules.
- Click Create Definition and select the new rules destination.

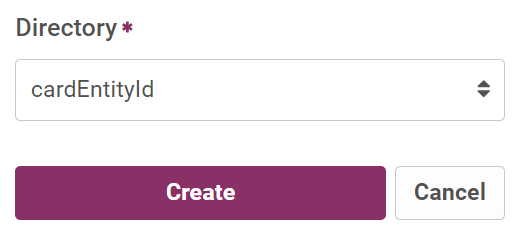
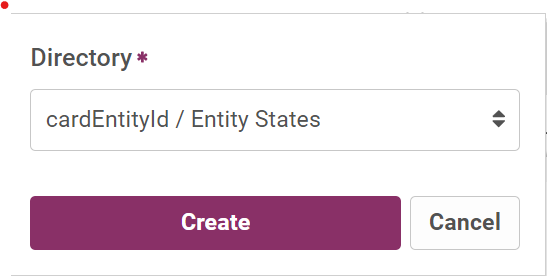
- Select the directory for the Entity you would like the rule to be under. For the rule to trigger for a card entity, you select cardEntityId and click Create.
- Type in the following in the blank rule block that appears when you have selected the directory:
Copy
@alert
@eventType("cardRT")
@eventType("cardNRT")
rules.RuleExample1:
event.amount.baseValue >= 1000 - Click Save to create the rule in staging. When you saved the rule, you can perform unit tests.
Run Unit Tests:
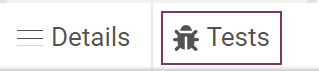
- Open the created rule and click Tests.
- Click + under the Tests options to add a new unit test.
- Click New test.
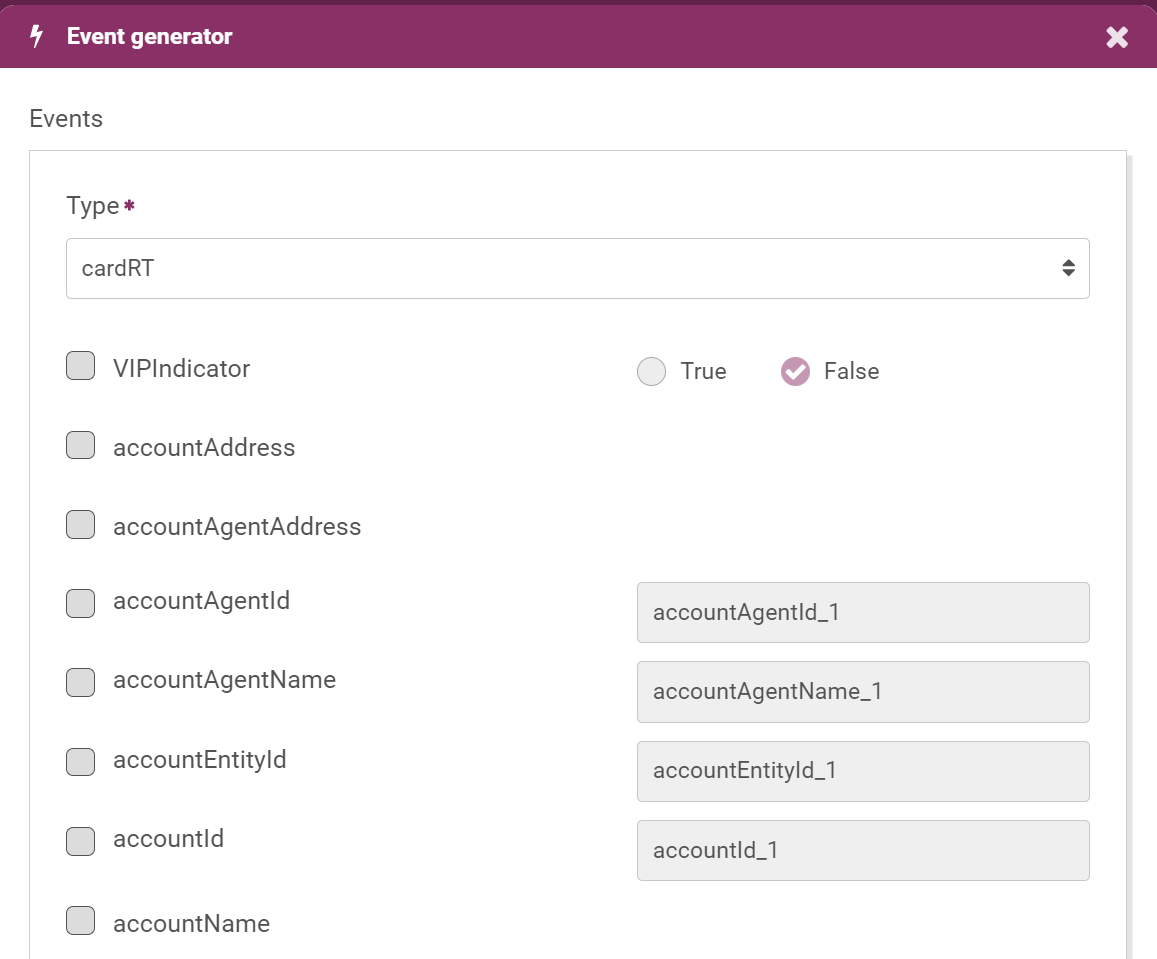
- Click Event generator from the Input event (JSON) section.

- From the Event Generator window, select the event type as cardRT in Type from the menu.
- Keep the populated mandatory and non-mandatory values for generating an event.
For this example, ensure that the
baseValueis set to a figure over 1000, for example, 2000. - Click Submit to generate an event.
- Under the Check Rule list, select either Check triggers. Check triggers tests that there is a positive outcome, while Check does not trigger, checks for a negative outcome.
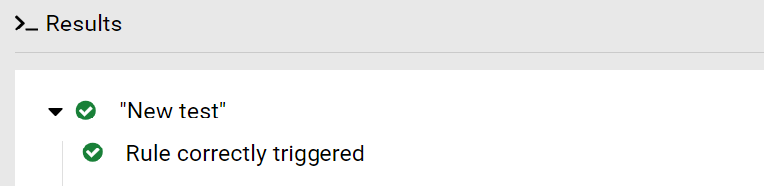
- Click Run tests. If the test is successful, a tick appears in the Results pane.
- Click Save to save the test.
The ticks under the Results section indicates that the rule was correctly triggered.
Rule for All Transactions in a Period
In this example, you can extend the basic rule that you created in the first example to create an Entity State that collects data of all ATM transactions in the last 30 days for a token.
Details of the Entity State
The state includes the following conditions:
-
Identifying if the transaction took place outside of the country.
-
Identifying if the billing amount of the ATM transaction exceeds 30 in the last 30 days.
-
Indicating if the MCC code is 6011.
The state also include a histogram for analysing the data over time. The histogram includes a bucket size in order to collect the accumulated values every 2 days.
Details of the Rule
When you've specified the state, you can create a rule that uses the data in the state. In this example, the rule creates an alert (by using the @alert annotation). The rule contains the following information:
-
eventTypeis cardRT or cardNRT. -
The MCC in the rule is 6011.
-
Transactions are through an ATM where the cumulative value of all ATM transactions in the last 30 days is greater than 1000.
-
The token is not listed in the
whitelistedCardsdata list.
Create a Rule
You need to include details of the state in its own directory, and then create the rule. In addition, the name of the state must be unique.
- If a directory for the state doesn't exist, create a directory.
- Click Create Directory.
- In the displayed window, enter a suitable name (for example Entity State) in Directory Name and click Create.
- When you have created the directory, click Create Definition and select the created directory.
- Click Create.
- Type in the following in the blank rule block.
Copy
@eventType("cardRT")
@eventType("cardNRT")
@histogram(historyLength=30d, bucketSize=1d)
state.ATM_History30days:
(event.cardCountryCode != event.merchantCountry) &&
event.amount.baseValue > 30 &&
(event.merchantCategoryCode == "6011") ? event.amount.baseValue
- Click Save.
- When you have created the state, create the rule in the cardEntityId directory in the blank rule block.
Copy
@alert
@eventType("cardRT")
@eventType("cardNRT")
rules.RuleExample2:
event.merchantCategoryCode == "6011" &&
lists.whitelistedCards !# event.cardId &&
((state.ATM_History30days.total(30d) ?? 0) + event.amount.baseValue) > 1000
- Click Save to create the rule in staging. When you have saved the rule, you can perform unit tests.
Run Unit Tests
- Open the created rule and click Tests.
- Click + under the Tests options to add a new unit test.
- Click New test.
- Click Event generator from the input event (JSON) section.
- From the Event Generator window, select the event type as CardRT or CardNRT from the Type menu.
- Keep the populated mandatory and non-mandatory values for generating an event.
- In this example, enter a
baseValueof over 1000. Ensure that you set themccEntityIdto 6011. You can refer to the following JSON example to ensure that the values match:Copy{
"amount": {
"baseCurrency": "baseCurrency_1",
"baseValue": 2000,
"currency": "currency_1",
"value": 994.8
},
"cardEntityId": "cardEntityId_1",
"cardId": "cardId_1",
"cardProductType": "cardProductType_1",
"direction": "inbound",
"eventId": "eventId_1",
"eventTime": "2024-05-28T18:05:01.058Z",
"eventType": "cardRT",
"fromId": "fromId_1",
"localDateTime": "2024-05-28T18:05:01.058Z",
"mccEntityId": "6011",
"merchantCategoryCode": "merchantCategoryCode_1",
"msgStatus": "msgStatus_1",
"msgType": "msgType_1",
"schemaVersion": 1,
"tenantId": "tenantId_1",
"toId": "toId_1",
"transactionId": "transactionId_1",
"transactionType": "transactionType_1"
} -
In the Initial state area, add the condition to test the state used in the rule.
Copy
@histogram(bucketSize = 1d, historyLength = 30d)
state. ATM_History30days: {
"data": {
"2023-03-21": { "size":0, "total":850}
}} - Under the Check Rule list, select Check triggers. Check triggers tests that there is a positive outcome, while Check does not trigger, checks for a negative outcome.
- Click Run tests. If the test is successful, a tick appears in the Results pane.
- Click Save to save the test.
Rule for All Transactions at a Merchant
In this example, you create a rule that has an Entity State for collecting data of all transactions at Car Rental Agencies (MCC 7512) over the last 30 days in a token.
Details of the Entity State
The state includes the following conditions:
-
the
eventTypeis cardRT or cardNRT. -
the MCC code is 7512.
-
There are five or more transactions for the token associated with the 7512 MCC code in the last 30 days.
The state also includes a histogram for analysing the data over time. The histogram includes a bucket size in order to collect the accumulated values every day for the 30 day period.
Details of the Rule
The rule includes all the above information of the entity state. However, the token is used 5 or more times for a Card Present transaction.
Create a Rule
The Entity State needs to be in its directory. You can use the Entity States directory that you created in the second example.
- Click Create Definition.
- Select the directory for the Entity you would like the state to be under. For example if you want the state to trigger for a card, you select cardEntityId > Entity States and click Create.
- In the blank rule block that appears when you have selected the destination directory of the state, enter details of the state.
Copy
@eventType("cardRT")
@eventType("cardNRT")
@histogram(historyLength=30d, bucketSize=1d)
state.Txn_at_MCC7512_30d:
    event.msgType.lowercase() == "authorization" &&
(event.merchantCategoryCode == "7512") ? Event.amount.baseValue - When you have created the state, create the rule in the cardEntityId directory in the blank rule block that appears.
- Enter details of the rule.
Copy
@alert
@eventType("cardRT")
@eventType("cardNRT")
rules.RuleExample3:
event.msgType.lowercase() == "authorization" &&
event.merchantCategoryCode == "7512" &&
!event.pointOfServiceContext.cardPresent &&
((state.Txn_at_MCC7512_30d.size(30d) ?? 0) + 1 >= 5)
Run Unit Tests
- Open the created rule and click Tests.
- Click + under the Tests options to add a new unit test.
- Click New test.
- Click Event generator from the input event (JSON) section.
- From the Event Generator window, select the event type as CardRT from the Type menu.
- Keep the populated mandatory and non-mandatory values for generating an event. These values match the following JSON.
Copy
  "amount": {
    "baseCurrency": "baseCurrency_1",
    "baseValue": 1001,
    "currency": "currency_1",
    "value": 0
  },
  "cardEntityId": "cardEntityId_1",
  "cardId": "cardId_1",
  "cardProductType": "cardProductType_1",
  "direction": "inbound",
  "eventId": "eventId_1",
  "eventTime": "2024-05-28T22:18:24.237Z",
  "eventType": "cardRT",
  "fromId": "fromId_1",
  "localDateTime": "2024-05-28T22:18:24.237Z",
  "mccEntityId": "6011",
  "merchantCategoryCode": "merchantCategoryCode_1",
  "msgStatus": "msgStatus_1",
  "msgType": "msgType_1",
  "schemaVersion": 1,
  "tenantId": "tenantId_1",
  "toId": "toId_1",
  "transactionId": "transactionId_1",
  "transactionType": "transactionType_1"
} - In the Initial state area, add the conditions to test the state used in the rule.
Copy
@histogram(bucketSize = 1d, historyLength = 30d)
state.Txn_at_MCC7512_30d: {
"data": {
"2024-04-09": { "size":4, "total":500}
}} - Under the Check Rule list, select Check triggers.
- Click Run tests. If the test is successful, a tick appears in the Results pane.
- Click Save to save the test.